Terms of mapping

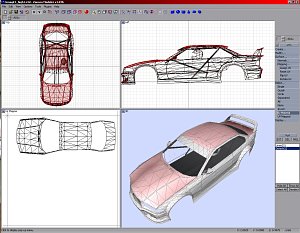
Mapping means that you put the content of an image file, such as a TGA, to some selected faces of your car's model. This can be done either from either top/down, left/right or front/back. Which is a fact that sounds more trivial than it actually is, as it means, that on mapping faces that are neither fully oriented along x,y or z-axis, the mapping will always be distorted. To have as little distorted mapped faces as possible, it's very important to carefully select which faces to map from what side.

  • NHeat can only handle textures from 24-bit uncompressed TGA files

  • Those TGA files need to have square dimensions ! Valid dimensions are
    • 32x32
    • 64x64
    • 128x128
    • 256x256
    • 512x512
    • 1024x1024

  • There's a limit on the total number of texture files that Heat can put to your PC's video memory - the limit is set by some internal counter, NOT by how much video RAM your PC has ! Exceeding the counter limit will make NHeat crash

  • TGA dimensions affect the mod's performance.
With ISI games, cars almost always come along with a lot of different mapping files. With NHeat, it's very important to have as few TGA files for mappings as possible. If you want to have more than just one car type in your mod, some suggestion would be to have

  1. one 1024x1024 TGA for the car body's paint/livery. It will be car specific
  2. one 1024x1024 TGA for cockpit interieur textures and any car type specific textures that should not be user-paintable
  3. one 1024x1024 TGA for all nontransparent, non-cartype specific textures. Such as tire textures
  4. one 1024x1024 TGA for all transparent textures. Assuming these should not be user-paintable

The advantage of using TGAs this way is that it can be used for making multi-car mods to cut down the number of TGAs very effectively. Both GroupC and Sportscar GTS mod mappings for example had been done that way. GroupC mod has 9 different car types and won't crash with Lemans track even when running a 35 car field. Try running other multi-car mods at Lemans and you'll notice how well this way of mapping works with NHeat.

Transparency

Different game engines use different ways for applying transparency to 3D model parts such as windshields. ISI's SCGT game for example interpreted some certain color value for transparency, so every texture part that was intended to be "transparent" in the game had to have that certain color value.

With NHeat it's different. Texture files (the TGAs) HAVE to be transparent to show up transparent. This is often called "having an alpha channel/layer", but just means, that on creating such a texture, you have to tell the graphics program that it should have a transparent background.

Here's an example how to make a semitransparent blueish windshield texture with Gimp
  1. Click on File -> New...
  2. On the popup window, chose square dimensions according to what Heat requires (for example 128x128)
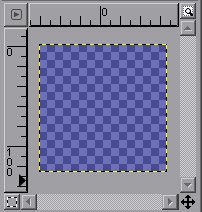
  3. Open up the Extended Options dialog and in the Background Color drop down list, chose Transparency
  4. The new image should show some chessboard alike pattern
  5. Select Color Fill Tool
  6. Set Opacity to 30%
  7. Set Primary Color to some blue
  8. Use Color Fill Tool on the image. It should have become blueish, but still show that checkboard pattern.
  9. Save the image as 24 bit uncompressed TGA; name it glas.tga
If you're struggling with Gimp to get transperancy right, you may want to have a look at TGATOOL

That's it. You now have a semitransparent texture that could be used for mapping the windshield. You'll have to convert the TGA to TEX by using WinresToolsWizard's MKTEX mode, with /a option enabled(!) and pack it to some RES or CAR file to use it with NHeat.

Mapping

I'd suggest to first map all those parts that are NOT part of the livery, but that we don't want users to be able to paint afterwards. Assuming that we aready have put all "non-paintable" textures to that single 1024x1024 TGA as described above and that this TGA has the name modparts.tga. Further assuming there's some file modglas.tga for transparent parts.
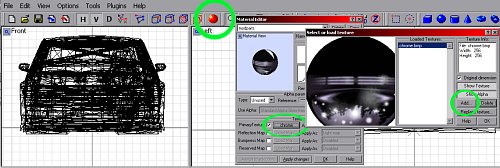
  • Add modparts.tga to Zmodeler's texture pool:
    1. Open Material Handler
    2. Click on Copy in Material Editor
    3. Scroll down the Material List
    4. Rename the 2nd <default material> to modparts
    5. Click on "Primary Texture"'s Load Map... button
    6. On the popup window, click Add... button and select modparts.tga

  • Add modglas.tga to texture pool the same way as modparts.tga
    • When added, in Material Editor switch Type to Glowing

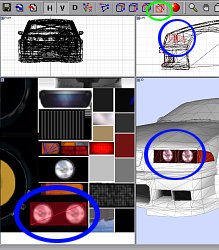
Now unselect all faces of the 3D object you are working on, then select all faces that you want to map to a certain material. We'll use the mapping of some headlight for example:
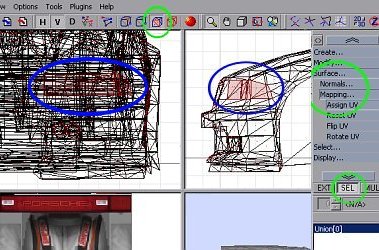
  1. Switch to Face mode in Zmodeler
  2. Chose function Select... -> Single
  3. By right-clicking on the related faces, select the right headlight's area
  4. By left clicking on that tiny square on top left, set one of the editing areas in # Zmodeler to UV Mapper mode
  5. Make sure SEL is enabled
  6. Chose function Surface... -> Reset UV
  7. Use Reset UV Function by left clicking to some editing area
  8. Make sure
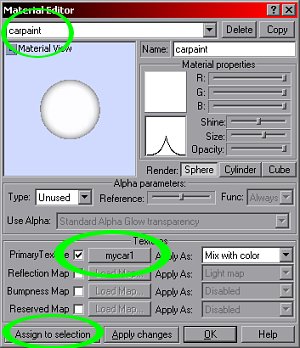
  9. Open up Material editor
  10. In Material Editor, select material modparts
  11. Use Assign to selection function, then quit Material editor
  12. Chose function Surface... -> Assign UV
  13. Right-click on the editing area that is set to Front view mode
  14. Now switch to Object mode
  15. In editing area that is set to UV Mapper you can now use editing functions such as
    • Modify... -> Rotate
    • Modify... -> Scale
    • Modify... -> Move
  16. Move the object in UV Mapper to the texture part that you want to map to it

Once you've finished, start over at 1 to map other parts of the car. For step 13, chose carefully from where to Assign UV. To adjust an already applied mapping, just select the related faces, then use Assign UV - this function doesn't cause changes to the mapping, but puts it to UV Mapper, enabling you to work on it


Car Paint Mapping
Up to this point all the car's parts that will not be part of the car paint should have been mapped. So now we can move on and care for the car paint

  1. Create some 1024x1024 TGA, all white, and save it as mycar1.tga
  2. Load mycar1.tga to ZModeler's texture pool and assign it to some new material in Material Editor, name it carpaint. Same way you did with modparts.tga
  3. If your car's body is made from several objects, you should now merge all those objects that still have some unmapped faces
  4. switch to object mode
  5. Use Create... -> Objects... -> UniteSelect
  6. Switch to Face mode
  7. Use Select... -> BY Material -> <default material> on the car body's object
  8. Use Create... -> Objects... -> Detach on the car body's object
  9. Name the new object body
  10. Only select the body object
  11. In Face mode, now select all the Faces that should be mapped from the top and that belong to the same area. Some rear spoiler's top for example is not the same area as the hood. Take care there's no overlapping areas
  12. In Material Editor, select material carpaint
  13. Use Assign to selection function, then quit Material editor
  14. Chose function Surface... -> Assign UV
  15. Right-click on the editing area that is set to Top view mode
  16. Switch to Object mode
  17. In editing area that is set to UV Mapper you can now again use editing functions to move the mesh where you want it to be mapped to
    • On scaling you should take care now to always scale along both y- and y- axis at the same time
You'll have to go through 11-17 for all the remaining unmapped areas of the car. If there's overlapping areas, you'll have to map each of these one at a time.

The reason we did name the car paint's texture file mycar1.tga is to be able to make multiple car paints afterwards: Any texture file called [carname]1.tga will always be interpreted as a placeholder (by NHeat) for the real car paint files. Which will have names car[number].tex. NHeat won't really make use of mycar1.tex - it doesn't even need to be in the mod. But the car body has to be mapped to mycar1.tga !

Now for making car painting easier, we might want to have the scaling of the mapping be the same on all the car body areas... here's some suggestion how to do this:
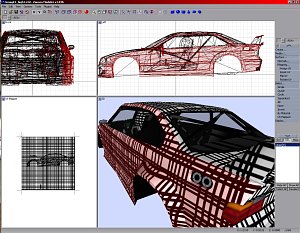
  • Instead of using a blank, white texture file, use one that has a nonregular pattern of black lines on white background.
  • After having mapped the car's top, this pattern will help you to move/scale the sides', front, back, etc mappings to match the top's mapping, as there's now on the car's body lines that have to connect exactly. Always only use scaling on both x- and y-axis at the same time !
When sometimes later there might be some necessity to do some bugfixing on the 3D model (and there WILL be...), moving vertices or replacing faces, you'll have to remap all the affected faces. Unless you like to get distorted mappings in places... By substituting the car paint texture file with the striped patterned image, you'd be able to remap any single face if needed - and exactly to fit to it's neighbor's mappings

Car Paint Template

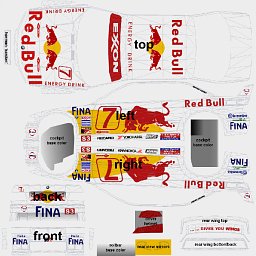
Once the whole car body has been mapped, you can make a template for car painting

  1. Select the car body object
  2. Switch to Face mode
  3. Use function Surface... -> Assign UV
  4. In UV Mapper you now should see all the car body's mesh mapped to mycar.tga
  5. Use F button in UV Mapper area
  6. In Material Editor, select carpaint material and uncheck it's primary texture
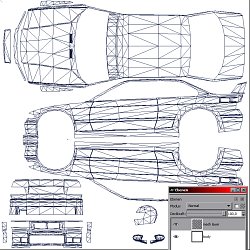
  7. In UV Mapper, you now should only see the car body's mesh on white background. Should somewhat look like the image on the left
  8. Take a screenshot from UV Mapper
  9. Copy only the mapped area's part from that screenshot to a new image (transparent background) and resize that image to 1024x1024
  10. Use Gimp's Color Select Tool on the image and delete all white colored areas
  11. Open Layer Dialogue window in Gimp
  12. Add a new layer to the image, move that new layer to below the "mesh layer"
  13. Save the image as multiplayered image in PSD or XCF format

Glossiness

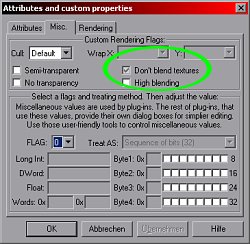
On each of the parts of the car that you have just mapped, you should make a mind about how much glossiness it should have in NHeat. The ONLY way in Zmodeler to adjust glossiness (don't confuse it with the normals) is to set it in Edit -> Attributes -> Misc. There is NO way to adjust anything regarding glossiness in Material Editor, unlike one would expect. NHeat simply doesn't care about any of the more sophisticated settings in Material Editor.
  1. Switch to Face mode
  2. Select the faces which's glossiness you want to adjust
  3. Chose Edit -> Attributes -> Misc
  4. If you want to have gloss on the faces, uncheck Don't blend textures
  5. If you don't want to have gloss on the faces, check Don't blend textures

Enabling glossiness to some faces makes NHeat add some environmental texture mapping of it's own - it doesn't show in Zmodeler. The related texture file envmap.tex is located in common.res The default envmap.tex is for making glossiness on glas mappings look right - and unfortunatly it looks rather shitty on any other material's mapping such as a car paint.

So you may want to customize envmap.tex, which can be easily done.

Here's some example envmap.tgas that you could use straight away or play with it's gamma curves. The more contrast and the lighter the envmap.tga, the more intense and the more "white" the glossiness will look. The trick is to get it look right for the car paint AND and glas as NHeat only supports ONE envmap.tex, which will be used for gloss on all materials.

Remember that after adjusting envmap.tga, you'll have to use MKTEX on the TGA to get envmap.tex. And that you'll have to pack that envmap.tex to common.res, which has to be copied to your mod's main folder

[ Texture Mapping ]