|
First get the paint template for the car you want to paint.
For the GroupC mod's cars for example
this is the GCSC-Templates
-
Open up the template for the chosen car. We'll be using the GroupC Porsche
template as an example and load it to Gimp. You can use
any graphics manipulation program of your liking though, but Gimp is for free and does all
we want it to do :)
This tutorials is not about how to use a graphics program. It's assuming you are
familiar with at least basic graphics manipulation techniques.
-
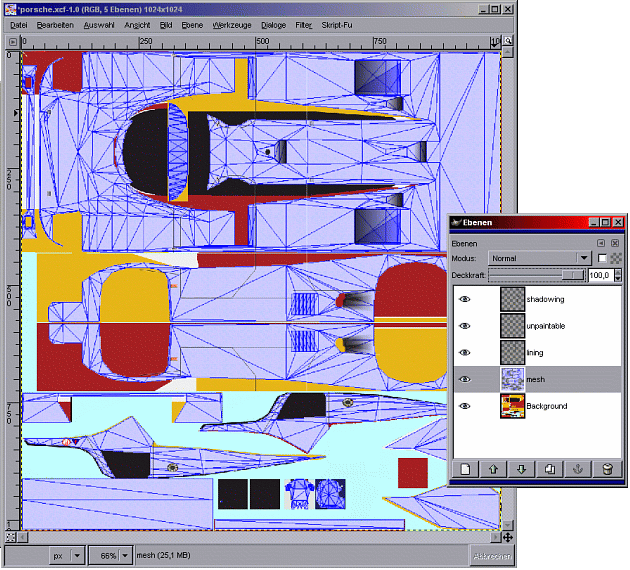
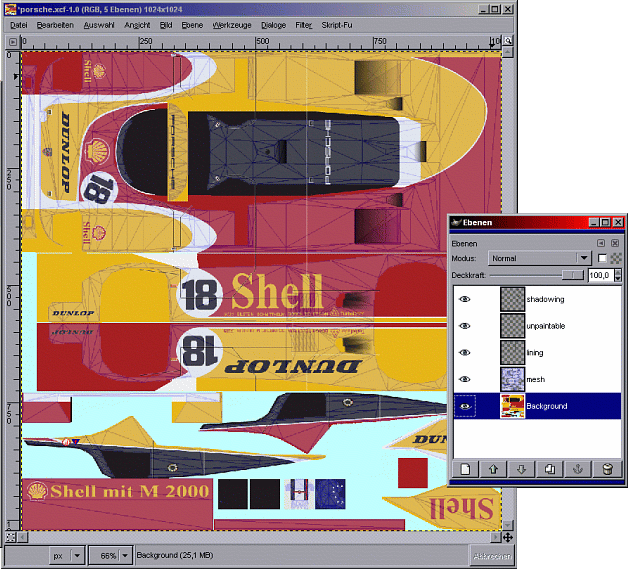
Once you have loaded the template to the graphics editor, have a look at it's layer stack.

You will notice that the template has several layers:
- shadowing - this one is for emphasing 3D effects
- unpaintable - typically this would be engine parts or alike
- lining - fake 3D effects such as door frames
- mesh - how the image is mapped to 3D mesh
- background - paintable area
You should only work on the background layer or on new layers that you have added !
On templates for other mods things may be different. Sometimes there ain't even
layers at all. That case I strongly suggest to add layers on top of of the template
and only to work on these.
- Adjust the mesh layer to about 20% opacity to make it just even visible on top of the
background layer. Switch to background layer.

- Always only use one color on one layer. This means you need to add additional
transparent layers on top of the background layer, naming them "color#2", "color#3", etc.
Especially at working on color transitions this will ease up things.
- Add a transparent decal layer on top of the color layer. Don't ever place decals in a color layer.
You'll probably have to move the decals to make them be placed on the car where you intended them
to be. With decal borders not already being aligned to any color this will be easier done.
- Once you have finished painting the template, adjust the mesh layer opacity to 0%. Make in invisible.
- Save the paint. Then export it to uncompressed TGA format. You'll probably get a warning
message that there's no layer handling in TGA. Ignore it.
- Rename the your saved TGA to "carXXX.tga", where XXX has to be a number. Lets say its 123 for example
- Now convert the car123.tga to Heat TEX format. For doing this you need to have the
MKTEX utility. Start notepad (or any
other editor) and add in that line:
mktex.exe car123.tga car123.tex
Save as mkcar.bat in the same folder where your car123.tga file and mktex.zip are located.
Now you can simply double click on the file mkcar.bat (probably it will show up as "mkcar").
If things went well, now there should be a car123.tex file show up in the folder.
If not, you most probably have not saved the paint as uncompressed TGA. Start over then.
Open up drivers.txt with notepad (or any other texteditor) in the mod's folder that you have made your paint for.
Copy a table entry and edit it to make it fit your needs:
| table Driver |
|
| number 123 |
<- change the number to match the number of your carXXX.tga file |
| name Painter |
<- change the name to what you want the car to show up in Heat |
| chassis porsche |
<- change the chassis entry to the chosen car type you made the paint for |
| rank 1 |
AI skill |
| race_image 100 |
|
| body_style fcar |
|
| end |
|
Copy your car123.tex file to the mod's main folder.
Start the mod. Your paint now should show up on the car selection screen. Load it and go to
Garage track. By using F4 view you
now can take a close look at your paint. If you want to do additional work on it, you won't even
have to shut down NHeat. Just switch back to your graphics program.
After having done additional work on the paint, continue at point 8., but without starting NHeat again
as it's already running. Just switch over after having copied the altered carXXX.tex file to the mod
folder. You will notice that any changes now show up in Heat even without having restarted.
|
|


