NHeat physics tutorial

This is a step-by-step tutorial about Nascar Heat physics

It is intended to be a guideline for setting up physics while implementing a new car model to NHeat. The order it treats the different aspects of NHeat physics supports the implementing process. This tutorial does not claim to be the one and only truth about NHeat physics, but it is coherent, and it works! If you nonetheless stumble along any NHeat physics phenomenon that you think is opposite to what information you have found here - feel free to point it out on the forum for discussion

There's just one file for each car that has all the physics information - physics.val. It's compiled from a text file like the one you can find here. All the Physics Tutorial chapters are about parameters that are in physics.val There's some - few - parameters that are not explained here. Guesses about those parameters' usage can be found on the commented example physics table nonetheless. This way this tutorial is an almost complete guide to NHeat physics.

Modding NHeat - Physics/Dimensions

First thing you have to do on physics when you put a car to NHeat is going for those values that cause visible changes on the car's appearence in the game. These are

TABLE PARAMETER DIMENSION
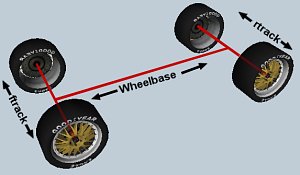
Table Chassis wheelbase in
Table Chassis ftrack in
Table Chassis rtrack in
Table Front/Rear tire_diameter in
Table Front/Rear width mm
Table Front/Rear model tire set name

Any changes on these values in physics will be visible in the game.

First of all you'll have to put some tires to your car and this is done by pointing to some tire 3D model, that has to be located in part.res. Each tire model actually is a set of files

  • tire.tab = tire LOD definition file
  • tire0.mod = tire 3D LOD model that is displayed in F2 view
  • tire1.mod = tire 3D model that is displayed at close distance (on high res cars only)
  • tire2.mod = displayed at not-that-close distance (on high res cars only)
  • tire3.mod = displayed at close distance (on low res cars) and less close distance (on high res cars)
  • tire4.mod = displayed at notable distance
  • tire5.mod = displayed at even bigger distance
  • tire0f.mod = same as tire0.mod, but for moving car
  • tire1f.mod = same as tire1.mod, but for moving car
  • tire2f.mod = same as tire2.mod, but for moving car
  • etc...
The tire file name can be different, but it is important to add the digits and the "f" on the different LODs

You'll want tires to be placed in the correct position at the car, so you either have to adjust the car's body 3D model wheelbase to the wheelbase value in physics (recommended) or vice versa. Typically you'll try to get info what wheelbase the real life counterpart of your simulated car has, put physics value to that size and carefully adjust the 3D model to this.

This is how it looks like if 3D car model and wheelbase, ftrack, rtrack, tire_diameters don't fit to each other.

To fix this on this example you'd have to increase tire_diameters and decrease wheelbase, ftrack and rtrack

To position the car's center, set model_offset's y-value to something negative - or move the car's body in zmodeler/3dsmax

ftrack (front track width) and rtrack (rear track width) values, front and rear tire_diameter and front and rear tire width have to be treated likewise:
  • If tires exceed the car's width, decrease ftrack/rtrack.
  • Increase rtrack/ftrack to move tires away from the car's length axis
  • If tires exceed wheelwell dimensions, decrease tire_diameter
  • If tire look somewhat lost in wheelwells, increase tire_diameter

To put the model's body to the right place, there's 2 options:

  • You could move the model in your 3D modeling program
  • you could mess around with model_offset parameter
model_offset moves the car body's 3D model center (x,y,z = 0,0,0) to what you want it in Heat to be. Or leave it model_offset untouched and instead move the 3D model. Typically you'll have to move it back/forth to get it centered correctly (front/rear wheels need to have same distance to the 3D model's center. And you'll need to move it up/down to get standard ride height right. If you insist on using model_offset:
  • model_offset x value moves the car's center left/right
  • model_offset y value moves the car's center up/down
  • model_offset z value moves the car's center to forward/backwards
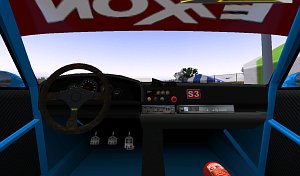
Modding NHeat - Physics/Driver's view

Next thing to close in to would be all those attributes that affect cockpit view (F1) in the game.

TABLE PARAMETER DIMENSION
Table Chassis head_pos x,y,z
Table Chassis head_pitch degree
Table Chassis shifter_throw x,y,z

head_pos sets the driver's head position. Only way to get this right is: setting head_pos to something, putting this to the car, running NHeat and check in cockpit view if it's correct. Trial and error...

This driver either is very small or head_pos has to be adjusted.

The driver's head needs to be moved to

  • left (negative x value)
  • upward (increase y value)
  • forward (increase z value)
on this example

head_pos is a x,y,z-value, where first number is left/right, second number is height and 3rd number is positioning the driver's head along length axis of the car.

  • head_pos x value = decrease to move driver's head left, inrease to move right
  • head_pos y value = decrease to move driver's head down, inrease to move up
  • head_pos z value = decrease to move driver's head back, inrease to move forward

head_pitch sets the angle of the driver's view.

  • Looking down = head_pitch negative
  • Looking up = head_pitch positive

Modding NHeat - Physics/Gauges

There's quite some gauge parameters in Heat physics optionally to be set, and they all work the same way. There's 7 gauges that can be used:

TABLE PARAMETER DIMENSION
Table Chassis tachometer x,y pixel
Table Chassis speedometer x,y pixel
Table Chassis oil_pressure_gauge x,y pixel
Table Chassis oil_temp_gauge x,y pixel
Table Chassis water_temp_gauge x,y pixel
Table Chassis fuel_gauge x,y pixel
Table Chassis volt_gauge x,y pixel

To make any of them work, you'll have to put "dummy helpers" to your cockpit 3D model for each gauge that you want to be working. This tutorial only will be about analog gauges for now. But digital gauges basically work the same way, it's just graphically different. Check here for how to do digital gauges

Each dummy helper's center has to be positioned to where the referring gauge's needle center is intended to be located. The dummy helper must have the same name as the gauge physics it refers to. The oil_pressure_gauge dummy helper object for example has to be named

  • high0:oil_pressure_gauge needle.mod
assuming the dash object's name is high0[0] and the needle's 3D model that should be used on this gauge is needle.mod (has be be in part.res)

Now you need to adjust the needle movement to the gauge that you have put in.

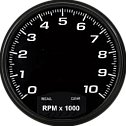
Let's say you're using a gauge like the tachometer to the left and have it mapped to your car's dash. The gauge's IMAGE size could for example be 128 x 128 pixel (can be any size) - it doesn't matter what size the MAPPING is !

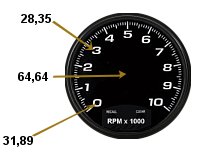
The axis of the tachometer needle would then be located on the tachometer's center, which would be at x = 64 and y = 64 on the gauge image on this example.

Locate the x,y-position on the gauge image where the needle should point to when displaying 0 rpm (example = 31,89). Same about 3000 rpm, 5000 rpm etc. Any rpm value you like and as many as you like. In physics that has to be listed as follows:
  • tachometer 64,64
  • tachometer1      0   31,89,
  • tachometer2 3000   28,35
  • tachometer3 5000   62,10
  • etc
Your image manipulation program (Gimp, Photoshop, ...etc) will tell you what x,y positions you look for.

Take care on the order of values. You cannot jump from tachometer2 to tachometer4 for example. There's one restriction to the needle's movement: the starting value cannot be below and to the right of the needle's center

Every gauge setting works like described for tachometer. You don't need to have any gauges at all, nor do you need to put any gauge settings at all to physics; they are all optional.

[ Physics Basics ]